
Before I get to the bunny toy tutorial, here’s a little story on how I began making toys.
I’ve knitted toys for friends and for myself for a long time. I love knitting and making toys because it always brings happiness to people; they’re a constant companion for anyone (young and old) that needs one, and their love is unconditional. In my younger days I depended a lot on a stuffed toy (or multiple fuzzy friends). We had adventures in blanket forts during the Winter, and pirate ship rides on the backyard hammock in the Summer. Sometimes they decided to accompany me on outings to the park, so we could go running through the grass; or to the grocery store, so they can explore the towering food isles while sitting on my lap in the shopping cart. Wherever I went, they wanted to follow. I named them all, and in turn, they all had identities and stories and voices.
I was fortunate to have them in my life. They taught me how to be courteous and helpful, and to share and show love. It was our world, and we felt excited to be a part of it. I wanted the same experience for my friends and their children. The moment I started learning how to knit, I immediately grew curious in knitting in shapes. How fast could I learn to knit straight and consistently, so I could learn to increase and decrease stitches? My interest in toy-making grew like a weed, after realizing that I had a surplus of scarves in my drawer. I knew I needed to shift my focus onto other knits.
One morning in University, I woke up and I wanted to make a toy for one of my teachers. She was expecting and I felt the need to make something for her. I took the bus to the local bookstore and went on a search.
“Let’s hop over to the bookstore and see what knitting books I can find.”
“Any toy-making books?”
“Oh, here’s a nice one. And another. And another.”
I think I grabbed a dozen books, flipped through all of them, and decided on three. I couldn’t just choose one. I went home, walked to the yarn store down the street, got supplies, and started knitting.
I knit my first toy, an elephant, over a weekend. It wasn’t my absolute best work, and I was afraid that I was somehow letting the poor elephant down. He was still super adorable, so I wrapped him up and handed the elephant over to her husband (he’s a fellow instructor). He opened it and the look on his face just told me everything I needed to know. Even better was the sentence following his huge smile: “I think I want to keep him for myself!”
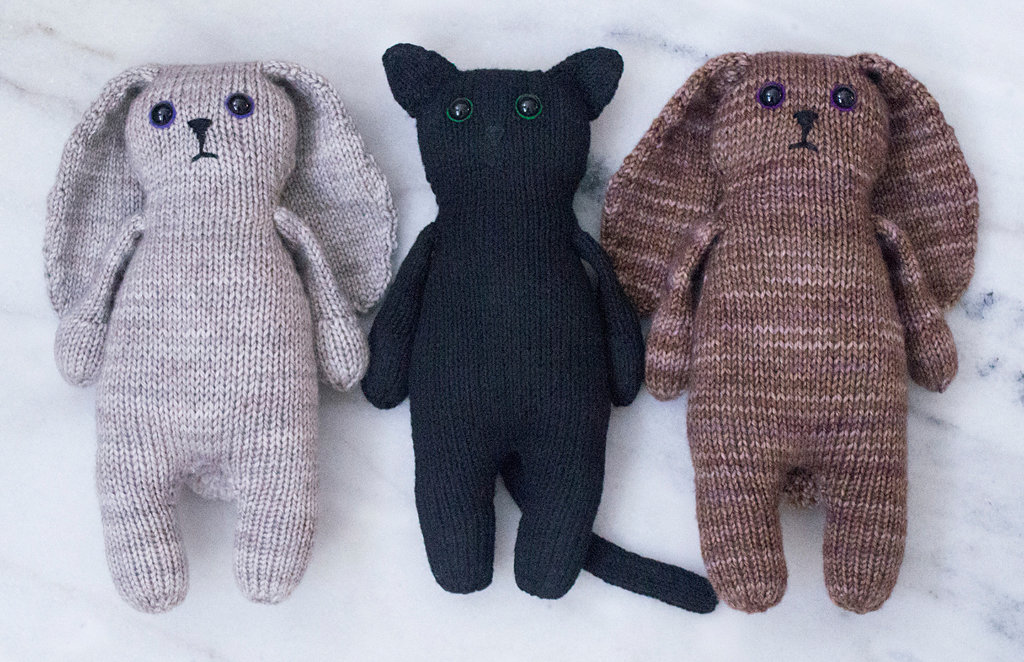
I fell in love with the elephant so much that I knit another. And then I knit some more animals. When I graduated from school, I received a cat toy pattern from my sister (she knows me so well) and I knit that pattern numerous times as well. It was such a cute pattern that I continued making kitties using that pattern, until I married my husband. I made one last cat–a black one with green eyes–just for him.
After seeing my clowder of cats, I knew there was an imbalance in numbers.
“Where are the bunnies?! Okay! I need to remedy this situation.”
I drafted out a pattern for some rabbit ears and attached them to the cat pattern my sister gave me several years ago. Until recently, I wasn’t sure if I could share this with you at all, being that most of the knitting is from a fellow knitter’s pattern. And so for respect in creativity, I share with you only my bunny ear pattern. I highly suggest you check out Rebecca Danger’s crafts and buy her Greta the Captivating Cat Pattern on Ravelry or on Etsy, so you too can make a kitty (or bunny!) for your little one. I’m pretty sure they will go on amazing adventures together!
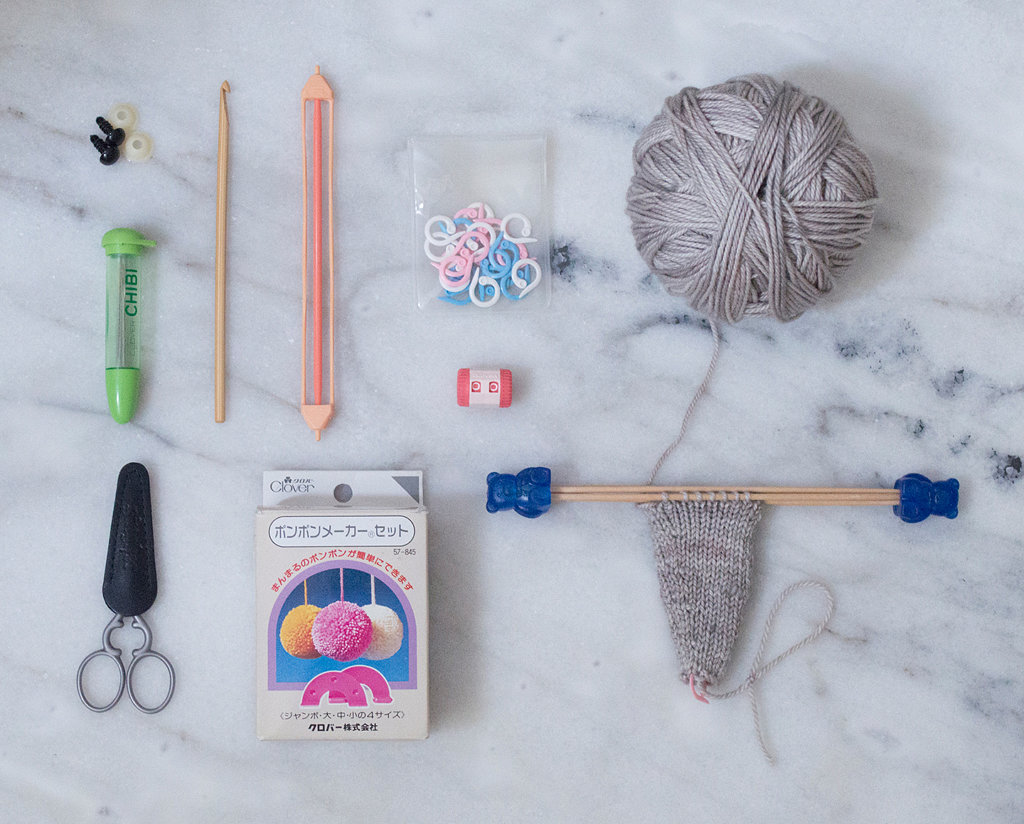
To begin this entire project, you will need a few supplies:
Yarn Specifications
When knitting toys, we don’t usually use the gauge given to us on our yarns. In fact, as Rebecca Danger says, it’s ideal to knit with needles 2-3 sizes down from what’s written on the band. This gives our toys a tight knit, and prevents the stuffing from showing.
On her pattern, the only thing she specifies is that you will need about 150-175 yards of yarn. Below, I’ve given you the run-down of the yarns I used for this project, though, you do not need to buy these exact yarns to make your bunny/cat.
White Bunny
- Fiber: Purl Soho; 100% Merino Wool; Heirloom White
- Length: Approximately 164 yards/100 grams
- Gauge: 18-20 stitches = 4 inches, using US 7-8 needles
- Fiber Care: Hand wash, lay flat to dry
Brown and Grey Bunnies
- Fiber: Anzula Luxury Fibers – Cricket; 80% Superwash Merino, 10% Cashmere, 10% Nylon; Shiitake and Seaside
- Length: About 250 yards
- Gauge: 20 stitches = 4 inches, using US 5 needles
- Fiber Care: Machine wash cold or hand wash, lay flat to dry
Black Cat
- Fiber: Lana Grossa Cool Wool; 100% Merino Wool; Black
- Length: About 175 yards
- Gauge: 24 stitches = 4 inches, using US 4 needles
- Fiber Care: Hand wash, lay flat to dry
Tools for this Project
- Rebecca Danger’s Greta the Captivating Cat Pattern (from Ravelry or Etsy)
- Plastic Safety Eyes with Washers (I use 10mm); Scrap Yarn
- Darning Needles
- Crochet Hook, optional
- Double Ended Stitch Holder
- Split Ring Markers
- Knitting Register
- Embroidery Scissors
- Pompom Maker
- Double-Pointed Needles
- Circular Needles, optional
- Needle Huggers/Needle Covers, optional
- Polyfil/Stuffing
Some of these tools are optional because it depends on if you need them in your project. The crochet hook is only used in the case of dropped stitches. I only use double-pointed needles for this knitting, primarily because I’m knitting in such short lengths; however, if you are comfortable in using circulars in the magic loop method, please, follow her pattern’s instructions. Lastly, I always have a set of needle protectors in the case that a knitting needle might slip out (and I lose stitches), and also to protect their points. If you have any questions about any of the supplies listed above, you’re welcome to ask in the comment box below. And please refer to her pattern for more information if you need more specification.
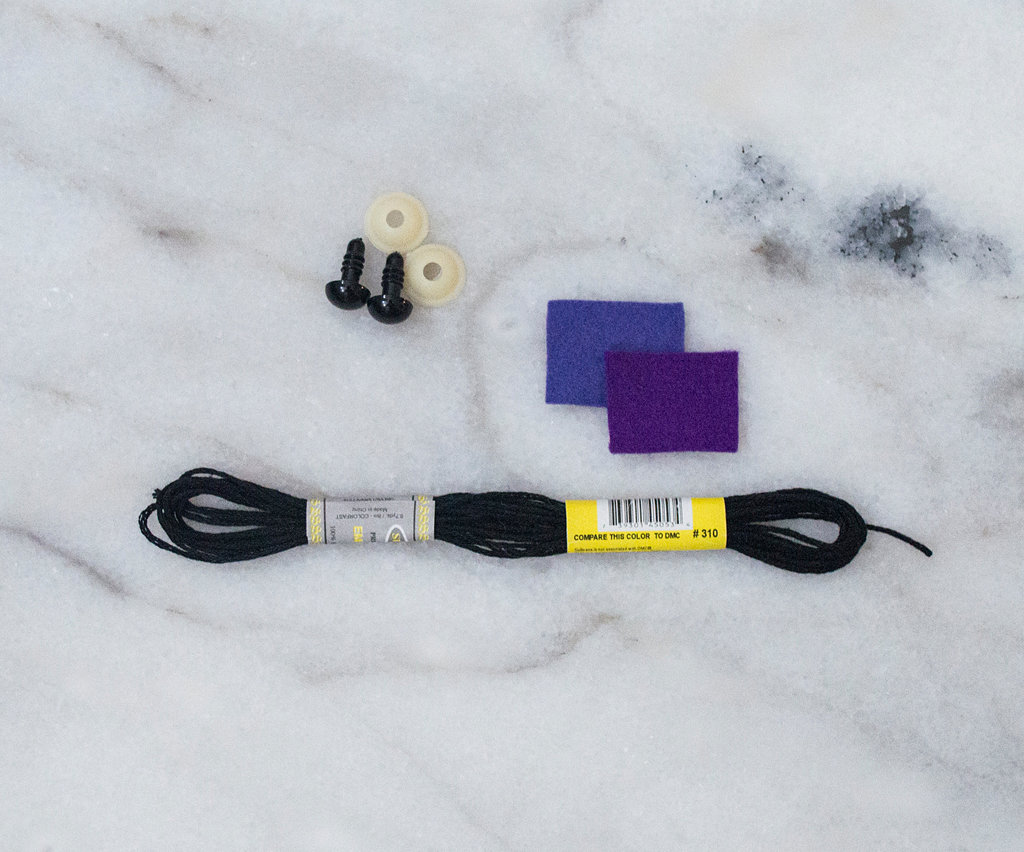
Some More Supplies
- Scrap Wool Felt, optional
- Embroidery Floss or Scrap Yarn
If you have plastic safety eyes with washers, and they have pupils already, go ahead and use those and don’t use the scrap felt. Or, if you are knitting this for an infant, use scrap yarn or some embroidery floss. In the case of using the scrap wool felt: cut out circles about 2-3mm larger than the plastic eye’s diameter. Create a small hole in the center of each circle and thread the back of the eye through.
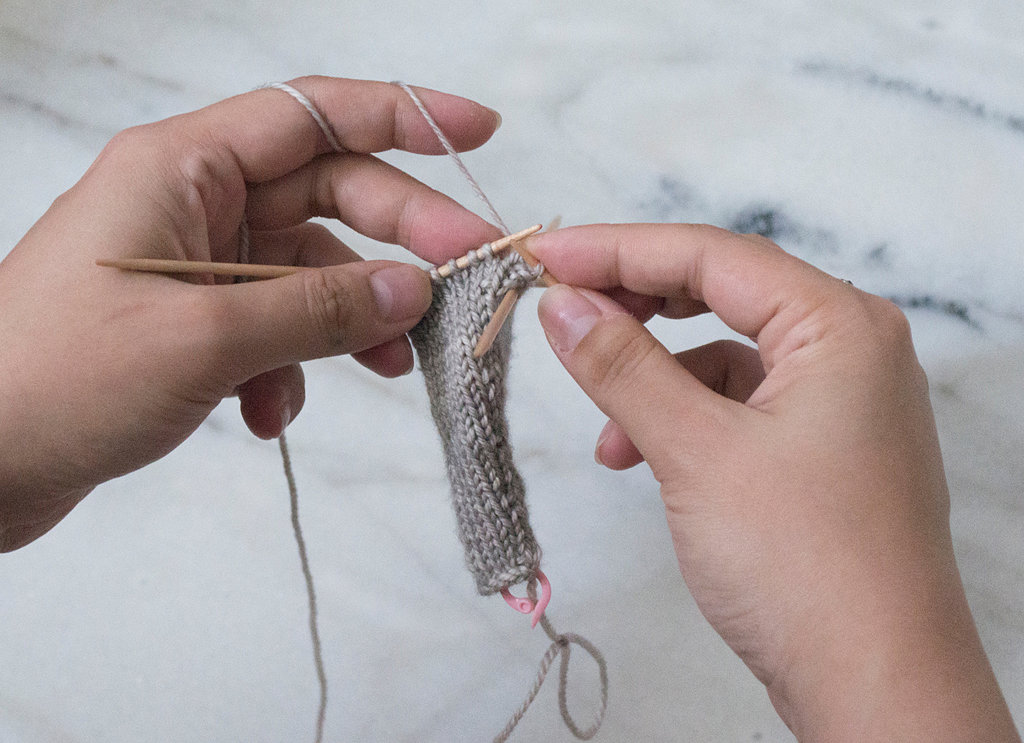
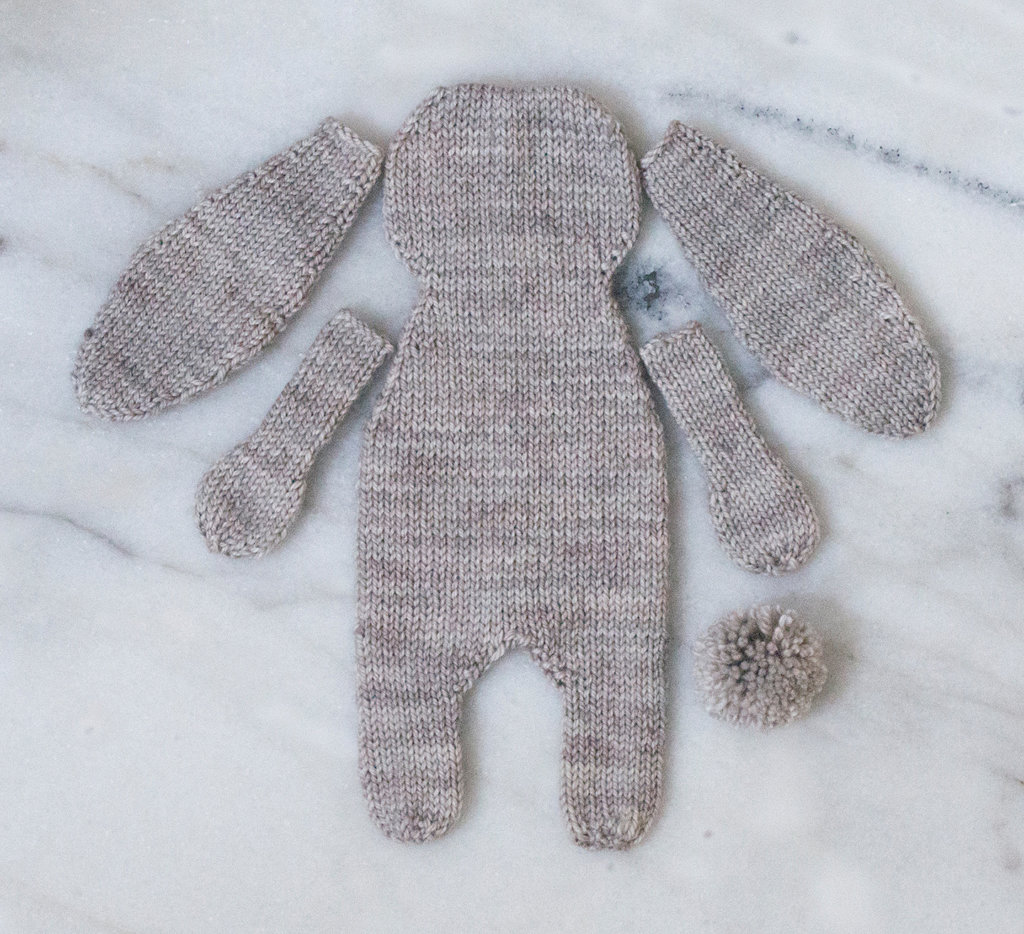
Pattern for Knit Bunny Ears
- Cast on 12 sts
- Separate stitches evenly onto three double-points (4 sts each onto each needle), taking care not to twist the stitches
- Begin working in the round, putting a stitch marker at the beginning of the round
- Round 1: K
- Round 2: (KFB, K5) twice (14 sts)
- Rounds 3-4: K
- Round 5: (K6, KFB) twice (16 sts)
- Rounds 6-7: K
- Round 8: (KFB, K7) twice (18 sts)
- Rounds 9-10: K
- Round 11: (K8, KFB) twice (20 sts)
- Rounds 12-13: K
- Round 14: (KFB, K9) twice (22 sts)
- Rounds 15-16: K
- Round 17: (K10, KFB) twice (24 sts)
- Rounds 18-19: K
- Round 20: (KFB, K11) twice (26 sts)
- Rounds 21-23: K
- Round 24: (K12, KFB) twice (28 sts)
- Rounds 25-27: K
- Round 28: (KFB, K13) twice (30 sts)
- Rounds 29-30: K
- Round 31: (K13, K2tog) twice (28 sts)
- Rounds 32-33: K
- Round 34: (K2tog, K12) twice (26 sts)
- Rounds 35-36: K
- Round 37: (K11, K2tog) twice (24 sts)
- Round 38: K
- Round 39: (K2tog, K10) twice (22 sts)
- Round 40: K
- Round 41: (K9, K2tog) twice (20 sts)
- Round 42: K
- Round 43: (K2tog, K8) twice (18 sts)
- Round 44: K
- Round 45: (K7, K2tog) twice (16 sts)
- Round 46: (K2tog, K4, K2tog) twice (12 sts)
- Round 47: K
- Round 48: (K2tog, K2, K2tog) twice (8 sts)
- Round 49: K2tog all (4 sts)
- Cut the yarn with a tail. Thread the darning needle and slip the 4 sts through. Pull to cinch and weave in the ends
Making the Tail
Use a pompom maker to make a tail for your bunny. I used the smallest one in the kit (diameter size: about 1¼ inches) to make a tail for both Shiitake and Maitake (see below for photos), since it’s a better size for their height. If you are making a tail for a larger bunny, I suggest you go up a size with the pompom maker.
If you are planning on giving this to a young child or an infant, make a wool-felt ball with a complementary color and securely sew with a similar color thread. Here is some more information on wool-felting.
Putting the Pieces Together
Follow the instructions on Rebecca Danger’s pattern: stuff the paws; secure the safety eyes (if you are using them); fill the body; stitch on the arms; create a nose and mouth; stitch on the ears and tail; check and see if they need to be stuffed more, and close the bunny up!
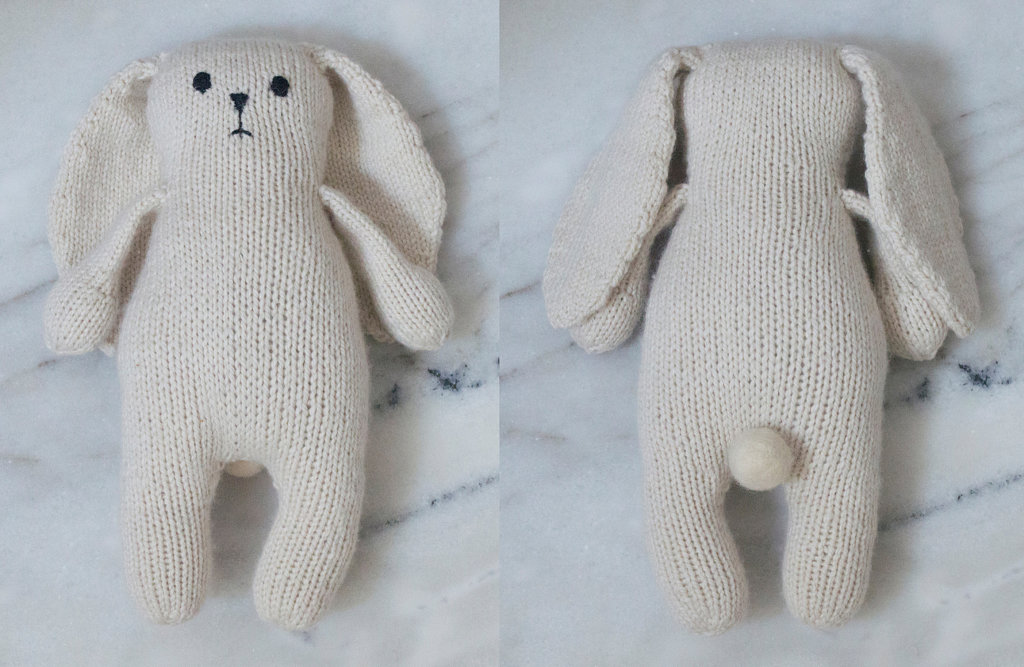
I used some embroidery floss for the eyes, nose and mouth, best suited for babies. I also attached a wool-felted tail instead of a pompom. This bunny measures about 12 inches in height, using US 5 needles.
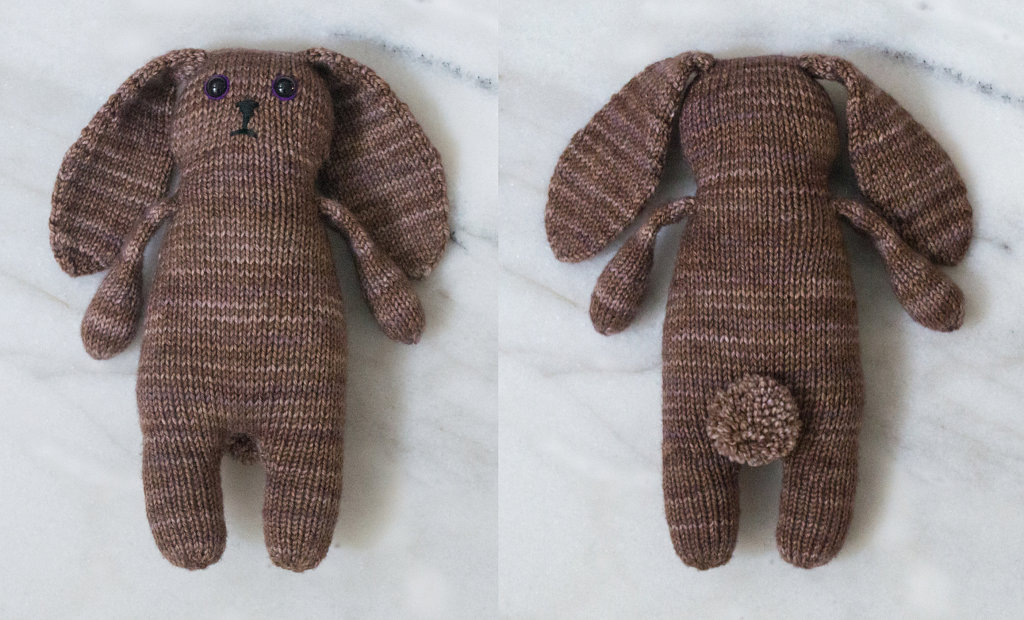
Here is my bunny friend, Shiitake. Yes, I took it from the name of the yarn because I thought it was so appropriate! And I *love* mushrooms! Her face is made with plastic safety eyes and embroidery floss, and she has a pompom tail. She measures to 9 inches in height, using US 2 needles.
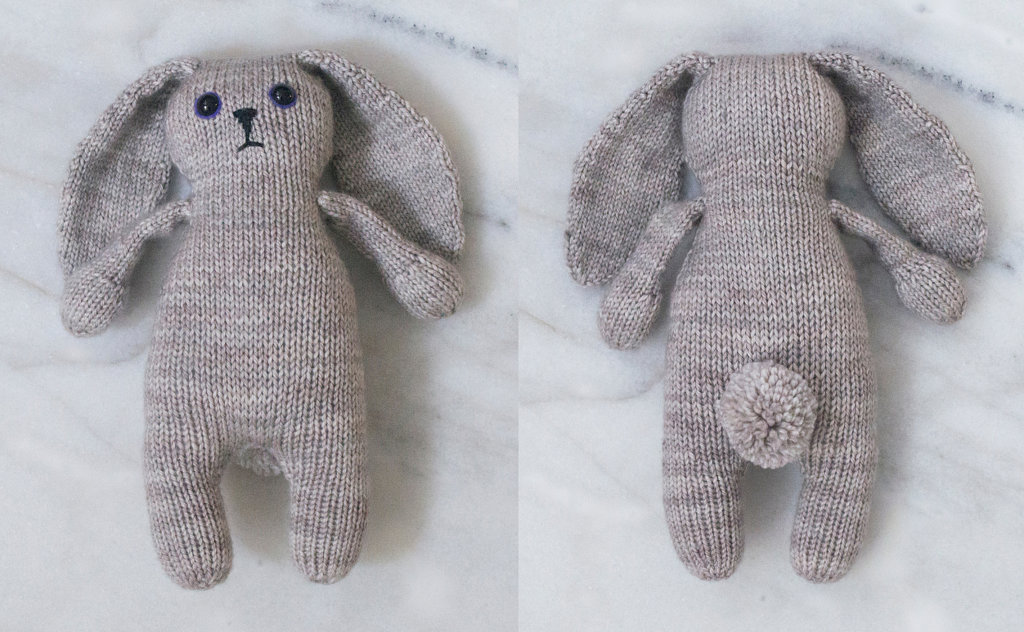
This is Shiitake’s twin sister, Maitake (Yes! Another mushroom!). She’s made exactly like her twin, with a lighter shade of purple for her eyes. She also measures to 9 inches in height, using US 2 needles.
**The links below are affiliate links to the tools I use for this project. Please, feel free to browse and ask questions on anything you see listed below. If you make a purchase, it will help towards the running of Everybunny Crafts!**


